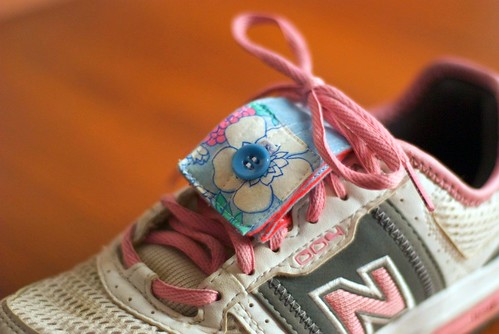
Make a Shoe Pouch for Your NIKE + iPod
 I’m entering this tutorial into the Sew Mama Sew tutorial contest. Check out the website – there are a lot of other really incredible tutorials already entered!
Did you buy a NIKE + iPod, but do not want to dole out the cash for the special shoes that go with it (the shoes have a special spot to hold the little gadget that tracks your speed)? Have no fear! This little pouch works just as well (loop it around the laces on top of your shoes), and is an ultra-quick sew, too!
(To see larger versions of all these pictures, just click on them and it will bring you to the corresponding images on Flickr)
You need:
- 2 L shaped pieces of craft felt in complementary colors, 2 × 7 1/4 inches each (if you are using higher quality thick felt you may need only 1 piece) Clarification: You want an L – shaped piece where the two long sides are 7 1/4 inches and 4 inches, and the two short sides are 5 inches and 2 inches. So the “leg” of your L shape is 2 inches wide and 7 1/4 inches tall, and the “foot” is 4 inches wide and 2 3/8 inches tall (and the top of the “foot” is 2 inches). So sorry for the confusion! [If you want a snugger fit, you can go as small as 1 1/4” across by 5 1/4” tall**
- 1 button or a small strip of velcro
- thread
- a small square of decorative fabric (optional), edges folded over and ironed to form a shape just over 1 3/4” square
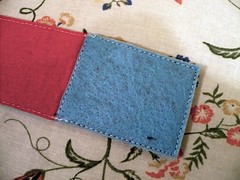
1. Pin the felt shapes together. Sew across the top of the “foot” of the L shape, using a 1/4” margin, and continue across to the other side.
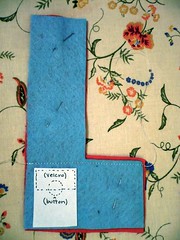
If you are using velcro, sew one side of it to the side you will be using as the outside color. It will go on the heel space of your L shape. If you will be using a button, you may either sew it on now or wait until the end to complete this step (it’s a little awkward to sew it on at the end, but I prefer to wait as it’s easier for me to match it up with the buttonhole)
2. Trim off felt as close to the stitches as you are able (only the stitches on top of the foot – not the leg!) Be careful not to cut into the stitches.
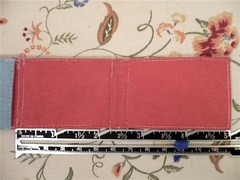
3. Now fold the “foot” over and pin it in place. You should now have a regular rectangular shape (like a lowercase L). 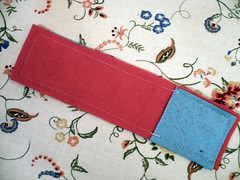
Sew all the way around this shape, using 1/4” margins. Trim of the extra fabric all the way around, cutting as close to the stitches as possible without cutting into the stitches.
4. Sew the decorative patch onto the end furthest from the pouch you have just made, sewing as close to the edge of the fabric as you can, so as to match it up with the rest of the seams you have sewn so far.
5. Make your buttonhole or sew the other side of the velcro onto the side furthest from the pouch you have just made.
6. To strengthen the felt and make it easier to fold, sew lines 1/8” and 1/4” from the stitching on the pouch, and again at the 2 1/4”,
2 1/2”, and 2 3/4” marks. Sew 2 lines perpendicular to these, on either side of the buttonhole all the way down the piece (but stop before going over the pocket).
7. If you did not sew the button on earlier, fold the pouch up (fold the flap over the pocket twice), and mark the under the buttonhole where you plan to sew the button on. Sew the button on over that mark (it will be on the side directly behind the pocket side). 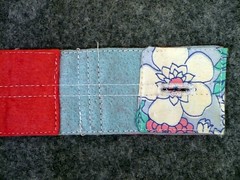
**UPDATE: My test subject (my DH) has told me his pouch is just a smidge too wide, and advises taking off a bit – at least an inch. If you would like yours more snug, too, you can go as small as 1 1/4” x 5 1/4” for the finished product; that would make the “leg” 1 1/4” wide, and the “foot” 2 1/2” wide. All the other measurements can remain the same (although if you are really wanting to minimize, you can – make the “foot” 1 1/2” tall and the long side of the “leg” 5 1/4” long ). Disclaimer: I think this would be a _very tight fit, and I haven’t actually tried yet to make one with the new improved measurements. So there is that. You have been forewarned! Also, I never posted any pictures showing how this is meant to fold to attach to your shoe, and since I’m still too lazy to do it, I’m going to mooch off of Annie Get Your Glue Gun, who made a pouch AND took the pictures I’m missing. Huzzah!_
And you’re done! Please let me know if you like this tutorial, and please please let me know if you have any questions or found any flaws in the instructions. Enjoy, and happy exercising with your new stylish pouch!
It probably goes without saying, but these instructions aren’t intended for commercial use. Thanks, and happy crafting!

I love my sis in law! She is the coolest!!! :) You really are!
— Desiree Rutter Apr 22, 06:34 AM #That is really cool! But, what is a Nike +iPod?
— AmyH Apr 22, 03:32 PM #Haha! I guess I didn’t explain that part, huh? A Nike + iPod is a little gadget that has 2 parts – 1 goes on your shoe (in your handy-dandy pouch that you made your very own self), and the other part attaches to your iPod Nano (I don’t think it works with the other kinds, at least not the last time I checked). The two parts “talk” to each other, and the Nano keeps track of your work-out (the distance you went, how fast, etc.) It’s all pretty nifty and high-tech, but in a very practical way. I hope that clears things up :u)
— Anna Apr 22, 04:35 PM #That’s such a great idea – I just put a piece of velcro on the tongue of my shoe and on the Nike+ piece….this is a much better plan!
— Brenda Apr 29, 10:49 AM #Thanks, Brenda! I made one for my hubby, too – he’s been using and it’s been working perfectly.
— Anna May 2, 02:29 PM #Hi Anna,
I saw this tutorial back in April at Sew Mama Sew and bookmarked it … and I’m now getting around to trying it out. I have a very basic one I created but my sister wanted one too, so I thought I would try your pattern. However call me a total beginner, but can you give me the dimensions for the “L” shape. 2in x 7.25in isn’t clicking when I try to cut it out. Is the leg of the leg of the L 1in x 7.25? This didn’t seem to fit the sensor …
Sorry if I’m totally over analyzing this or just not getting it … any help would be great!!
— Andrea Jun 10, 07:23 PM #Andrea –
Oh dear. I just looked back at my instructions and got confused myself! Not a good sign…
I have gone back and clarified the instructions a bit (i.e., added the correct measurements!). Please let me know if you have any other problems!!! (I can’t believe someone is actually using my tutorial! So cool!)
— Anna W Jun 10, 10:05 PM #I would like to make a shoe im very young
— cartese Aug 31, 12:53 AM #I just made mine today and I love it – thanks for posting this!
— KT Sep 1, 07:54 PM #