How To Make Lined Curtains
UPDATE: Oct 27, 2013 – Thanks for all the great comments! This post has been incredibly more popular than I ever imagined. Wow! Thanks for visiting and feel free to poke around. Even though it’s kind of dusty around here, I’m hoping to be adding more soon.
I hope I’ve been able to answer all your questions – some other very helpful folks have also left answers in their comments – I’ve tried to incorporate most of these into the tutorial but feel free to ask any more that I’ve missed. I read and appreciate each one! :) Now go enjoy your beautiful curtains!
Making your own curtains is easy-peasy, and making lined curtains is just one step up from the plain ol’ kind (and lined curtains last longer, provide a better screen for hot sunlight, and probably have some other benefits I’m not thinking of right now).
One side-effect I didn’t really expect is that making your own curtains is also very gratifying. I would recommend it on that point alone, although I also very much appreciate the economical points as well. In my world of work that is constantly undone, it’s so nice to have something that I can look at that I can think to myself, “Yeah! I did that! And look! It’s still done!” Kind of hard to wrap my mind around, come to think of it. Anyway, as I go from changing a diaper to washing the dishes, it’s nice to have a reminder that some of my efforts stick around for a bit longer.
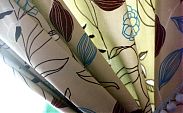
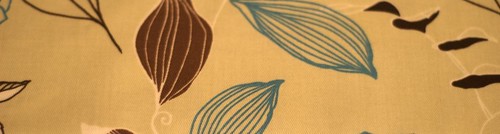
When buying fabric for curtains, I recommend splurging and buying the fabric that you really want, not just whatever is cheapest. I know it’s sometimes hard, (it is for me anyway) to buy the nice upholstery weight fabric when just yards away (heehee! get it? – sorry, I’m a bit punchy tonight) is sitting a perfectly “alright” fabric for half the price or less. But this curtain is going to make a huge impact on your room. So go for the stuff you really like (if you’re watching your pennies, you can wait for a sale or coupon). Buy your liner fabric based on the intensity of the light you are trying to block. They sell “black out” liner, good especially in bedrooms where you want to block out the maximum amount of light. I just bought the regular stuff; perfect for my purposes.
For this tutorial, I’ve used the measurements I used to make floor-length curtains for my own window, which is 67” wide x 49” tall, with the curtain rod about 87” off the floor. However, you can easily adapt these instructions for any size window. Also, please read through the instructions before you start – you may find something I did that you would rather do differently and need to adjust accordingly.
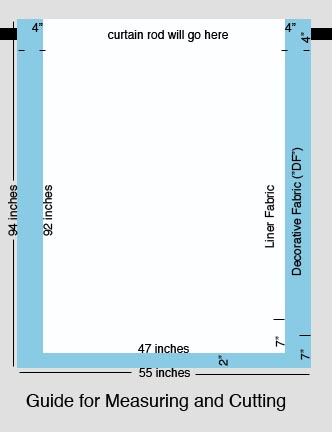
1. Cut your fabric. I want my curtains to be a little long so I cut my decorative fabric (hereafter referred to as “DF”) 94” x 55”, and cut the liner 92” x 47” (2” less than the DF at the bottom, and 4” less on either side), leaving room for a 7” hem at the bottom of each, and 4-6” for the rod pocket at the top.
_UPDATE: A handy rule of thumb here – figure out how long you want your finished curtain to be, then add the extra inches you need for your rod pocket at the top and your hem at the bottom (in this case, my “formula” for the DF looked like this: fabric length = finished length + 4”[rod] + 7”[hem]). Then you can figure out the measurements for the liner fabric based on that.
Also, Sheila (comment #51) has some good points about curtain width._
Now you get to start the fun part – sewing! :u)
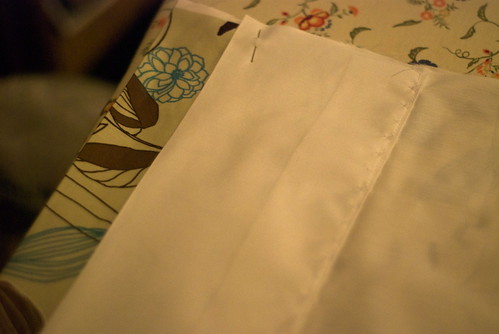
2. Hem both the DF and the liner. With the wrong side facing you and the edge of the fabric intended for the lower edge of the drape pointed toward you, fold the bottom edge up 2” and press, then 5” more and press.
3. Now you are going to do something called a “blind hem”. If you’ve never done one before, this video by Jenny T. (I don’t know who she is, but she makes a mean “how to” video!) is a helpful tool to give you an idea of what it is and how to do it:
(note: The video says to do this hem you need to get a special blind hem foot for your sewing machine. In actuality, you don’t really need a special foot to do this hem, but I imagine it would be helpful. When I did this project I actually didn’t realize there was such a thing as a blind hem foot, and just used my regular presser foot, while sewing carefully – I think I used the inside curve of the foot as a guide. My hem was perhaps a teensy bit more wobbly than it would have been otherwise, but I think it turned out fine)
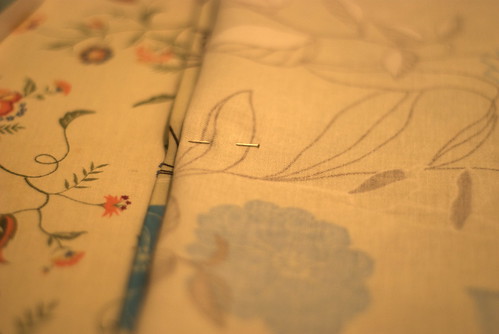
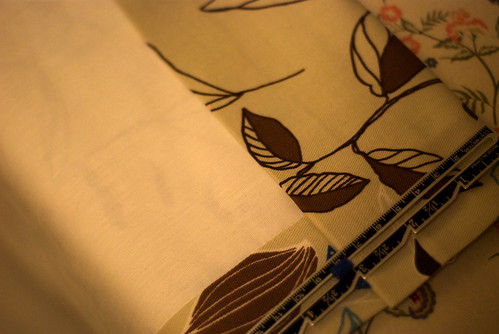
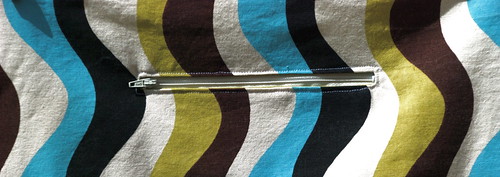
Here’s my hem, all set up for me to sew it up with my super-special blind hem stitch (Actually I have a very basic machine, so I imagine nearly all machines have this stitch or something comparable or better. But don’t tell my sewing machine. It thinks that it’s a super special blind hem stitch, and we might as well let it. It just makes my sewing machine so happy.)
If all this nonsense about blind hems just makes your head hurt, just do a regular hem – follow step 1 as directed, and then just go ahead and sew a straight seam across. I do encourage you to try, though – it wasn’t as hard as I thought it would be, and it gave me a great sense of accomplishment. And I learned how to sew a blind hem!
4. Now, sew up the sides with a 1/2” seam allowance. This isn’t tricky at all – just turn both your DF and the liner right side together (as if you were making a pillow), and sew up both sides. Make sure you match up the edges of the fabric from the top down.
You will end up with extra DF at the bottom and center. This is okay. It’s all part of the plan. I like lots (okay, 2”) of extra DF at the bottom (I think I saw a hanging curtain like that once – I don’t know if there’s a reason for the extra fabric), but if you prefer less, you can plan accordingly (cut more liner, or hem it up less).
5. Turn everything right side out, and press. You will have extra DF; make your crease with 2” (on either side) of the extra DF. This is where the extra 2” in the cutting guide image above comes in handy. Take a look at it if you’re confused.
6. Next, you want to sew a seam all the way down both sides, to hold the crease you just made in place.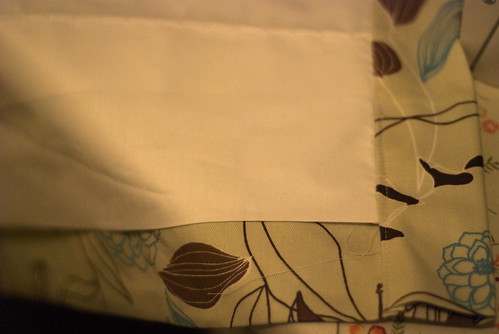
7. Lastly, make the pocket for your curtain rod. Fold the top (both the liner fabric and the DF) over 1” and press, and 3 more inches and press again. Sew along the bottom of this tube, making a tube that is about 3” tall.
Yay! You’re done! Hang your curtain and step back and admire your brilliant (and lasting!) handiwork!

Feel free to add your own recommendations and/or corrections to my instructions in the comments (I really appreciate these, so don’t hold back!)
The Magic of Feed Readers, or "What is RSS?"
Warning! Technology is discussed below! Most details are probably correct. But no guarantees.
I keep up with a lot of websites. Probably more than your average person. I might be addicted. But I’m not ready to admit it.
There are my faves, which I highlight in the sidebar of my blog, but there are also quite a few others I visit on a semi-regular basis. This is all made possible by a little gadget called RSS , coupled with it’s corresponding program, called a Feed Reader. I don’t understand exactly how it works, but I don’t need to.
To my understanding (very basic, to say the least), this is how it goes:
I go to a new website. “Hm,” I think, “This site is nifty. So nifty I would like to know more of what is going on here.”
So I find the RSS button on the page. Some sites put ‘em right up there, and others hide them away. But I’m pretty sure most newsy/blog sites have one. (Mine is hiding away on the left just above the Etsy pictures.) I click on it. If it pops up with some options, I just make sure and choose the one that says “RSS”.
Now I’m set. Maybe I surf around a little more, find 10 more sites that I like. The next day, while Bridget’s napping, I’m busy enjoying the quiet, chores are done (yeah right), and I’m spending some time on the internet. I think to myself, “Oh! I found all those cool websites yesterday! I wonder if any of them has any new content!” So I go to my feed reader (I use NetNewsWire, but there are many others), open it up, and check for new content.
This is what I see: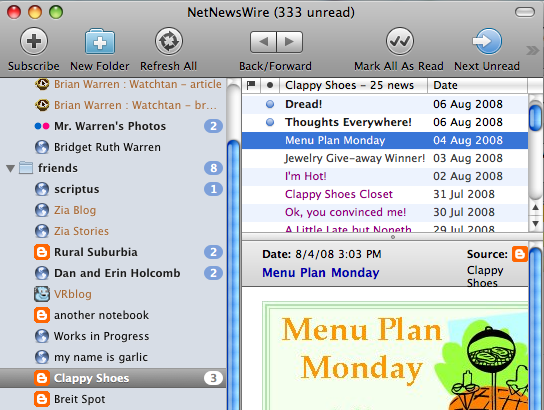
My nifty feed reader has magically been at work while I was gone. It cleverly knew that I wanted to stay updated on the status of those blogs, and so it went to them and when they got updated it was thoughtful enough to let me know! So sweet of it.
I like to read my blogs in my internet browser, so I usually double-click the entry to make it come up in a browser window but if I wanted I could probably read everything in this feed-reader program. Oh, and in case you were wondering, a browser is Internet Explorer or your equivalent – personally, I’m partial to Firefox or Camino. Basically, it’s your mode of transportation throughout the wide world of the web.
So that’s the mostly-short version. If you read this, and you’re thinking to yourself, “I don’t understand! Why would anyone want to do that?!” don’t worry about it. You have your system, and it works for you. If, however, you are looking for something to support your addiction to gazillions of websites, I have the answer! Actually, someone else does, and I’m presenting it here. But saying that doesn’t have the same ring to it.
Anyhow, here I give to you the solution of your website-addicted dreams. I’m such an enabler.
If you’d like to know more about this topic, there’s a great video called “RSS in Plain English”:
How to Make a Zippered Pocket
I’m making a bag for my DH using the adorable Mischievous Gnome Messenger Bag by Montessori By Hand. One of the things I’ve learned in the process is how to make a zippered pocket – something I really wanted to learn but was too intimidated (until now) to try. So I’ve put together a little tutorial that just covers this basically simple detail – the perfect touch for your new purse or handbag!
Make a Shoe Pouch for Your NIKE + iPod
 I’m entering this tutorial into the Sew Mama Sew tutorial contest. Check out the website – there are a lot of other really incredible tutorials already entered!

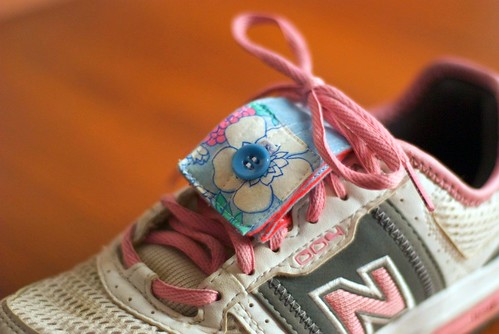
Did you buy a NIKE + iPod, but do not want to dole out the cash for the special shoes that go with it (the shoes have a special spot to hold the little gadget that tracks your speed)? Have no fear! This little pouch works just as well (loop it around the laces on top of your shoes), and is an ultra-quick sew, too!
(To see larger versions of all these pictures, just click on them and it will bring you to the corresponding images on Flickr)
You need:
- 2 L shaped pieces of craft felt in complementary colors, 2 × 7 1/4 inches each (if you are using higher quality thick felt you may need only 1 piece) Clarification: You want an L – shaped piece where the two long sides are 7 1/4 inches and 4 inches, and the two short sides are 5 inches and 2 inches. So the “leg” of your L shape is 2 inches wide and 7 1/4 inches tall, and the “foot” is 4 inches wide and 2 3/8 inches tall (and the top of the “foot” is 2 inches). So sorry for the confusion! [If you want a snugger fit, you can go as small as 1 1/4” across by 5 1/4” tall**
- 1 button or a small strip of velcro
- thread
- a small square of decorative fabric (optional), edges folded over and ironed to form a shape just over 1 3/4” square
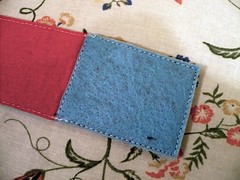
1. Pin the felt shapes together. Sew across the top of the “foot” of the L shape, using a 1/4” margin, and continue across to the other side.
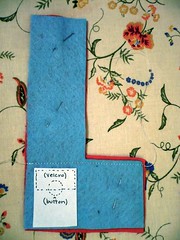
If you are using velcro, sew one side of it to the side you will be using as the outside color. It will go on the heel space of your L shape. If you will be using a button, you may either sew it on now or wait until the end to complete this step (it’s a little awkward to sew it on at the end, but I prefer to wait as it’s easier for me to match it up with the buttonhole)
2. Trim off felt as close to the stitches as you are able (only the stitches on top of the foot – not the leg!) Be careful not to cut into the stitches.
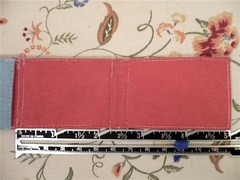
3. Now fold the “foot” over and pin it in place. You should now have a regular rectangular shape (like a lowercase L). 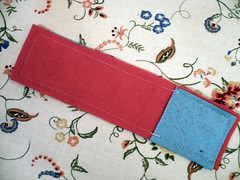
Sew all the way around this shape, using 1/4” margins. Trim of the extra fabric all the way around, cutting as close to the stitches as possible without cutting into the stitches.
4. Sew the decorative patch onto the end furthest from the pouch you have just made, sewing as close to the edge of the fabric as you can, so as to match it up with the rest of the seams you have sewn so far.
5. Make your buttonhole or sew the other side of the velcro onto the side furthest from the pouch you have just made.
6. To strengthen the felt and make it easier to fold, sew lines 1/8” and 1/4” from the stitching on the pouch, and again at the 2 1/4”,
2 1/2”, and 2 3/4” marks. Sew 2 lines perpendicular to these, on either side of the buttonhole all the way down the piece (but stop before going over the pocket).
7. If you did not sew the button on earlier, fold the pouch up (fold the flap over the pocket twice), and mark the under the buttonhole where you plan to sew the button on. Sew the button on over that mark (it will be on the side directly behind the pocket side). 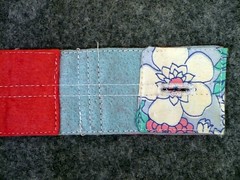
**UPDATE: My test subject (my DH) has told me his pouch is just a smidge too wide, and advises taking off a bit – at least an inch. If you would like yours more snug, too, you can go as small as 1 1/4” x 5 1/4” for the finished product; that would make the “leg” 1 1/4” wide, and the “foot” 2 1/2” wide. All the other measurements can remain the same (although if you are really wanting to minimize, you can – make the “foot” 1 1/2” tall and the long side of the “leg” 5 1/4” long ). Disclaimer: I think this would be a _very tight fit, and I haven’t actually tried yet to make one with the new improved measurements. So there is that. You have been forewarned! Also, I never posted any pictures showing how this is meant to fold to attach to your shoe, and since I’m still too lazy to do it, I’m going to mooch off of Annie Get Your Glue Gun, who made a pouch AND took the pictures I’m missing. Huzzah!_
And you’re done! Please let me know if you like this tutorial, and please please let me know if you have any questions or found any flaws in the instructions. Enjoy, and happy exercising with your new stylish pouch!
It probably goes without saying, but these instructions aren’t intended for commercial use. Thanks, and happy crafting!
How to Make (and Can) Plum Jam
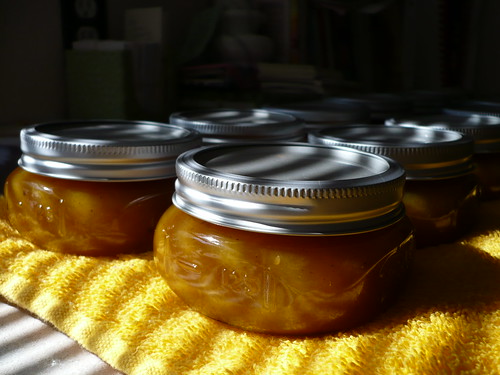
I made plum jam on Friday. It took me awhile – most of the afternoon – but now I have 12 shining jars of yummy jam! And most of the time spent was on preparing the plums. If you are working with regular-sized plums and not the cherry-sized ones that our tree made this year, I think it would take much less time. Also, this was only my second canning experience. That may have had something to do with it as well.
I had the hardest time finding a recipe for plum jam – nothing I found on the internet had anything concrete, and I didn’t have time to search through all my cookbooks or visit the library. So I kind of winged it. Well, not entirely — I did find some guidance on a few websites, but I added my own flair to that. Anyhow, seeing that there is such a dearth of plum jam recipes out there, I thought I’d post here about the process.
Here are the ingredients and tools you need (this should make about 6 half pint jars of Christmas Spice plum jam):
- about 3.5 lbs fruit
- 1/4 c Lemon juice (or “Fruit Fresh” – a vitamin c powder sold in the canning section)
- 1 box “no sugar needed” pectin
- 2 c sugar (you can add up to 3 c, or none, depending on sweetness desired)
- 3/4 c water (can use less or more depending on thickness desired)
- 1 teaspoon each cinnamon and nutmeg (optional)
- jars, lids, rings – jars and rings can be re-used, but the lids (the part w/ the gummy seal) can only be used once
- canning gadgets – canner pot, lid lifter, jar tongs, jar funnel – the magnetic lid lifter is not necessary, but useful. If you don’t have a canner pot, just use the largest pot you have, which would hopefully fit most of the jars you intend to fill. Place something in the bottom so that the water can circulate around the bottom of the jars – I read somewhere that you can even use flat stones, but I’m not sure about the source. I ended up using a turkey fryer – perfect!
- small pot to boil the lids
- large pot to boil your fruit (I actually used a smaller 2 quart pot, but almost boiled over a couple times)
1) First, gather your fruit. I used about a gallon of plums for the two batches that I made – I think it weighed about 6.5 pounds, or maybe 7. I had to sort out some fruit that had gotten too squishy, but had the luxury of being able to step out my back door and pick more from the tree.
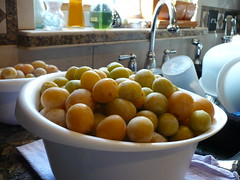
(Let me note here that having a plum tree just outside one’s back door sounds very dreamy and story-bookish, and actually is quite nice, until the fruit gets ripe and starts falling all over the concrete patio, creating a squishy path between the back door and garage. And then one’s cat becomes afraid to go out the back door during the daytime because of all the bees that congregate to feast on the fallen fruit. Also, the branches hang down so low with fruit all summer that no one can reach the back door without crouching nearly double. Not that I would know anything about that.)
2) Now is a good time to gather all of your tools and lay them out. Sterilize the jars (the dishwasher is fine for this – try to time it so that the jars are still warm when it’s time to use them – if you have a “heated dry” setting on your dishwasher, this is a good time to use it).
Sterilize the lids, too – at this point, I just got my pan of water ready so all I had to do when I was ready was turn the heat on. Or you can go ahead and bring the water to a boil for several minutes, and then just turn the heat down low until you need them.
Get the water bath ready in your canning pot – fill so that the jars you are using will be covered with at least 1 inch of water. Keep the water at a simmer while covered with lid.
3) Wash the fruit and sort it – this is the point where you decide what is too ripe or, as I like to put it, “squishy”.
4) Next, peel. Because their skin is so thick, plums really should be peeled. There is a super easy way to do this – prepare a bowl of ice water, and boil up some more water in another dish. Dip the plums into the boiling water for 30-60 seconds – you can use a metal colander for this, or just remove with a slotted spoon. Place them in the ice water to stop the cooking process. The skins should slide off fairly easily now!
5) Cut up the fruit. Cut out any brown or soft spots, remove pits, slice flesh into desired sizes. Place a metal spoon in a cup of ice water in preparation for step 9.
6) Add the lemon juice to the sliced-up fruit to keep the fruit from turning brown. Make sure all the surfaces are covered. I actually put the lemon juice in a bowl first, and added the fruit to the bowl as I cut it up – since the cutting process took me so long, this method worked pretty well for me.
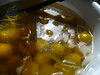
7) Add the spices, water, and pectin to the fruit, and bring the mixture to a full boil in your saucepan (make sure you have enough headroom so it doesn’t boil over!). You want the kind of boil that doesn’t go away when you stir it.

8) Add sugar to the boiling mixture. Continue the hard boil for 3 minutes, stirring constantly. Remove from heat.
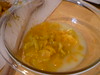
9) Test the set of your jam – using the ice-cold spoon that you prepared in step 5, get a spoonful of the hot jam mixture and cool it at room temp for a minute or so. (This is also a great opportunity to sneak a taste of your yummy jam in the name of “testing”.)
10) Fill the jars using the jar funnel. Clean the rims and place the lids on top, making sure that the rubber rim fits well on the jar. Screw the rings on until the fit is “fingertip tight”.
11) Place the filled jars into the canner. Put the lid back on, and bring to a boil. Boil for 5-10 minutes (there should be an “Altitude Chart” insert in the pectin box – mine said 10 minutes for 3,001-6,000 feet).
12) Remove jars from canner and set on a towel to cool overnight in a place where they won’t be disturbed.
Congratulations! You now have your very own shiny jars of yummy plum jam!
Let me know what you think in the comments, or if you have any tips that I missed. This website has quite a few good tips, on canning on on preserving in general. The insert that came in the box of pectin was also quite useful.
Using Sculpey to Make Window Hangings
We have this problem window in our stairway. It looks out into our neighbor’s backyard, and sits at just the wrong height (on our side), so that we feel uncomfortably exposed if we aren’t completely decent when we walk by. Which is necessary if we want to go up or down the stairs (our bedroom is upstairs, so this doesn’t leave many options if after we’ve gone to bed one of us starts fretting about locked doors or other things that need tending to downstairs).
Anyhow, this particular window is also an awkward shape for normal drapes. It’s octagonal which, I thought, would make drapes or really a curtain of any kind look odd.
My initial idea was to find some of those capiz shells and hang them in the window. I actually still think that these would be awfully pretty, and might change them some day, but I hadn’t seen any locally, and didn’t have the time to search (local stores or online) for a good deal.
Here enters one of the many wonderful uses of that great product, Sculpey (they aren’t paying me, I promise!). I bought a big block, rolled it out to about 1/4 inch thick, and, using various jars and other circular shapes, cut circles of descending size out of the clay. Oh, and I used a toothpick to make a little hole in one end of the circles.
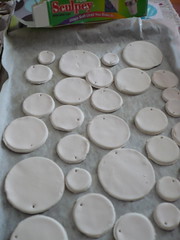
I baked them in the oven, following the directions, and then painted it with acrylics that I had (I actually mixed the colors to match some place mats that I really like). I think they all took two coats of paint. I still wasn’t pleased with how they looked, so I brushed some ModPodge over the surface to make them shiny.
Then I strung them on clear string that I found in the jewelry/beading section of the store. The hardest part was actually hanging them in the window. I hadn’t really thought it through ahead of time, so I spent awhile just standing there and staring at the window, and at my nice strings of Sculpey beads/capiz shell substitutes trying to figure out the easiest way. I wanted to leave myself the option of adjusting them in the future if I wanted.
I don’t know if I landed on the best option, but I ended up using tiny screw eyes (I got a pack for less than two dollars at the hardware store) in the frame of the window, and hanging the strings of Sculpey on a string that I threaded through all of the screw eyes.
Here’s the outcome
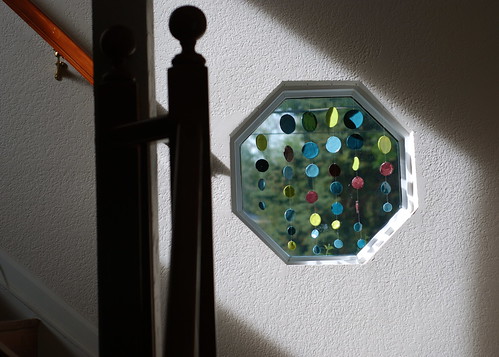
I’m actually pretty pleased with it – it’s not the same effect as capiz shells, but quite nice, and adds more color to that corner of the room than I could have gotten with plain white shells (I don’t think I could have found really cool colored ones like those in the flickr link above). It’s not as filled out as I envisioned – I might add more eventually – but for now it’s a great addition to our stairway window.
Have you made anything (with Sculpey or other things) to resolve problems with your home? If so, please share in the comments!